Setting up a proper cleaning kit can be costly. Some of the equipment is convenient and while others are essential. Settling on the right combination is largely a matter of personal preference. In this section all equipment will be discussed as well as their merits. It is a good idea to have a generous collection of barrel cleaning tools and solvents. It opens up multiple options to achieve the same job and it may save a lot of time and effort.
1. Bore Guide
This is a short metal tube normally with a soft shaped front end to engage in the Neck area of the chamber. There are bore guides with universal kits that is adaptable to more than one bore diameter and then there are single type rifle guides.
The purpose of the bore guide is twofold. First it is used as a guide for the cleaning rod, thus preventing any contact between the cleaning rod and the throat during cleaning. Secondly it can be used to introduce solvents without the risk of getting into the trigger or other sensitive components.
The front end of the bore guide should be a snug and firm fit. It will have an adjustable slider tube or similar to lock into the bolt arm cavity. Adjust the slider such that it will have a firm engagement. This will ensure that the guide stay in place while cleaning.
2. Cleaning Rod
The cleaning rod is a long straight round rod with a pushing handle at the back and a threaded male or female connection at the front. Some cleaning rods are coted and some are bare metal. Any one of the two can be used. The coated cleaning rod is not a good substitute for a bore guide and it is recommended that a good bore guide is always in place before using any cleaning rod.
The cleaning rod should be firm and closely resemble the bore diameter of the barrel. Excessive buckling of the rod is undesirable and may lead to throat damage. /a good quality bore guide will have a thrust bearing built into the pushing handle to allow the rod to turn with the lands during forward or backward motion.
Cleaning rods come in different lengths and it should always be long enough to clear the muzzle with a bore guide in place. When buying a cleaning rod always consider the added length created by the Bore guide.
Important Note: A cleaning rod should never be used as a battering ram. It should also not be hit with a hammer or heavy object. If any object attached or not to the cleaning rod get stuck in the barrel it is advisable to take the rifle to a qualified and experienced gunsmith for emergency treatment. A Gunsmith will have the correct tools to remove objects inside the barrel without causing permanent damage to any interior barrel surface.
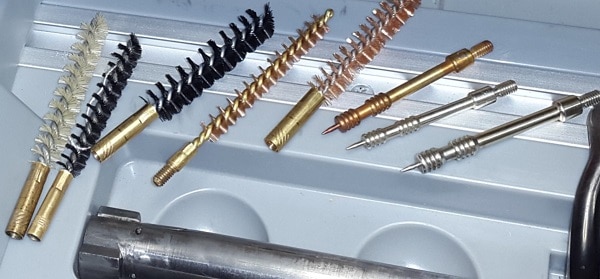
3. Brushes
Always use brushes of good quality with a firm twisted metal center, preferably from stainless steel. Two types of brushes are regularly used, nylon and brass. The brushes can be applied in two ways. Nylon brushes are generally used to scrub the barrel after it is soaked in solvent. Brass brushes serve a dual purpose. An under sized brass brush may be covered with a patch and then it simply becomes the holder of the path, while the correct size brass bush is used to scrub the barrel. The correct bore size brass brush can not be reversed once inside the barrel. It will require considerable force to reverse and in the process will become irreparably damaged. Reversing such a brass bush may damage the cleaning rod as well.
Many shooters are hesitant to use brass brushes. This is most likely due to horror stories where brass brushes have been incorrectly used. Other see no merit in using the softer nylon brushes and yet another group prefer to use patches only.
Important Note: Make sure the cleaning rod is long enough the push the brass brush through the combined bore guide plus barrel length and out at the muzzle. Otherwise the cleaning rod handle may get stuck against the bore guide all the way in while the brass brush is still inside the barrel.
4. Jag
A jag is a solid tool designed to hold a patch in such a way that it can be pushed through the barrel without loose the patch in forward or reversing strokes and without any metal part scraping against the sides.
The most popular jag is the piercing type. It is important to match the jag with the combined patch and bore size. Jags are available for all the popular calibers.
5. Patches and Rags
A patch is a soft piece of cotton cloth of any arbitrary size. Patches come in different thickness and different sizes. It is used in combination with a brass brush or with a jag. A bit of experimenting may be required to get the perfect snug but firm fitting “patch and jag” or “patch and brush” combination for a specific caliber.
Pre-cut patch sizes can be bought in bulk at most gun shops. The same material can also be bought in rolls if the need arise to make up custom sizes.
Important Note: A correctly wrapped patch should fit tightly into the barrel. It should be possible to push the cleaning rod into the barrel with one arm while holding the rifle with the other. If more force than this is required then it is too tight. Never use excessive force or impact to get the patch into the bore. It may get stuck and valuable time may be lost to remove it again.
6. Bore snakes
Bore snakes are very popular nowadays. It can not be used as a primary cleaning tool. It is a handy drop in tool to perform very basic cleaning in between shots or while hunting. It can not be used to replace a cleaning rod.
While the manufacturers of bore snakes will claim that they are every bit as good as a good old fashioned rod it is simply not the truth. Bore snakes can be dosed with solvent and they can be used to clean out most dirt and grime in one sweep. But they will most likely never do more than 75% of the job. Always back up bore snake cleaning with a proper cleaning procedure using a cleaning rod and patches.
Many different chemical solvents are concocted to assist with proper cleaning of the barrel. Without chemical solvents it will be very difficult to clean the barrel without harming the interior surfaces.
Important Note: Always work in a well ventilated area when using cleaning solvents.
1. Carbon Solvents
The Chemicals industry has been doing research to find carbon solvents for more than a hundred years. There are very little if any secret recipe’s for carbon removers. The only bad substance is chlorine. Make sure your carbon solvent, copper remover and gun oil is chlorine free as it will induce “stress corrosion crack” formation in metals in the long run. Various carbon dissolvers/removers/penetrators can be purchased from gun shops. No specific- or favorite- product will be mentioned here as there are a number of popular brands used by gun owners. It may be a good idea to choose a product that is able to dissolve carbon with some lubricating properties as well. Water based carbon removers are not recommended and will seldom be stocked by gun shops.
2. Copper Solvents
For copper removal the solvent will contain significant percentage of ammonia. The ammonia will be a solution as it is way too aggressive in this pure form and will most likely cause permanent damage by chemical erosion to the barrel. Different manufacturers use different recipe’s but in the end all of them will have more or less the same limitations. The human sense of smell is quite sensitive to ammonia and a simple way to judge the ammonia solutions is by rating them according to the smell intensity. The stronger the smell the faster copper will be chemically diluted.
3. Combined Carbon and Copper removers
There are a number of 2 in 1 products available. These products feature a mixture of carbon and copper removal solvents in one solution. In general the label will state that the product is able to remove both carbon and copper. Some are 3 in 1 where the label also state that it is able to remove lead residue in the barrel. It is up to the reader to experiment with the range of solvents stocked at local gun shops and then decide on two or three different single-purpose products or any of the all-in-one solvents.
4. Degreasing Solvents
These solvents are essentially the same as carbon removing solvents. In addition they also remove oil build-up and residue. Commercial “Brake cleaner” are quite popular and again it will have to be chlorine free.
5. Scrubbers and paste
For lack of a better word these cleaning agents scrub any build up with a mechanical albeit abrasive action. Extreme caution is needed when choosing such an agent and it needs to be a “very mild scrubbing agent” to remove only the minimum amount of metal and other hard to remove deposits from the barrel. A very popular scrubber is JB bore paste.
1. Penetrating
Stuff that is good at penetrating will generally not be good lubricants. WD-40 is a good example. Therefore most penetrating lubricants are mainly for penetration and should not be used to lubricate a rifle for long term storage. Kroil is also an excellent penetrator and and good for removing rust and carbon.
2. Preserving
Lubricants used for medium and long term storage should have good corrosion resistance and resist oxidation. One good example from the automotive industry is the trusted ATF Dexron.
3. Anti Wear / Extreme Pressure Lubrication
A liquid film of oil is not good enough to lubricate parts under high load where the oil is pushed out and the metal pair comes into contact with each other. The only way to provide lubricity under these circumstances it to have a solid compound between the surfaces. A well known example of a solid lubricant is graphite powder.
The better solids to use for rifles is Molybdenum Disulfide and possibly Boron Nitride. Both have very good lubricating properties as a solid and can be very useful in a very fine powder form.
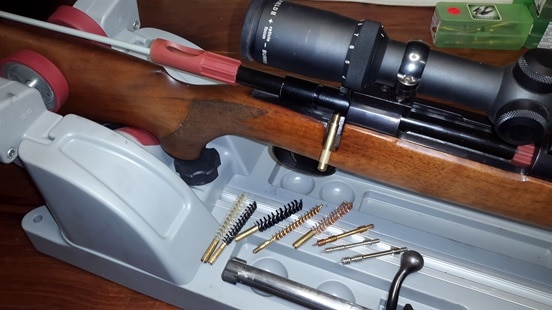
1. Gun Cradle
It is not easy to clean a rifle that lying on a blanket or on a table without any support. Various brands of gun cradles are available in gun shops. This is a very good investment and will make it so much more pleasant to clean a rifle. It is important that a rifle is mounted sloping slightly downwards so as to prevent any form of solvent to seep into the trigger mechanism.
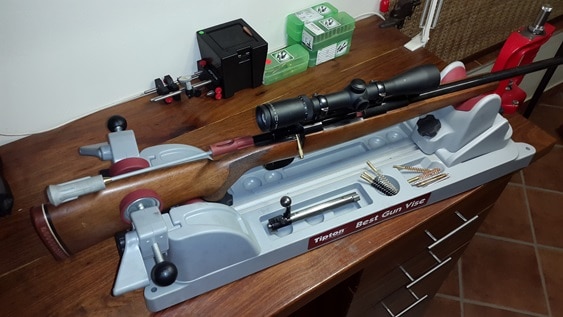
The gun cradle will also help to steady the rifle when working with the cleaning rod while pushing or pulling patches through the barrel.
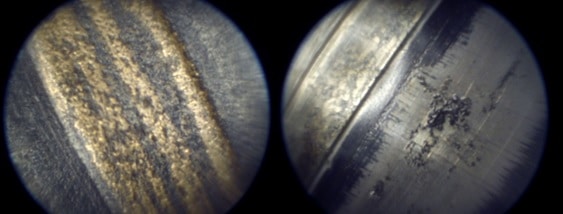
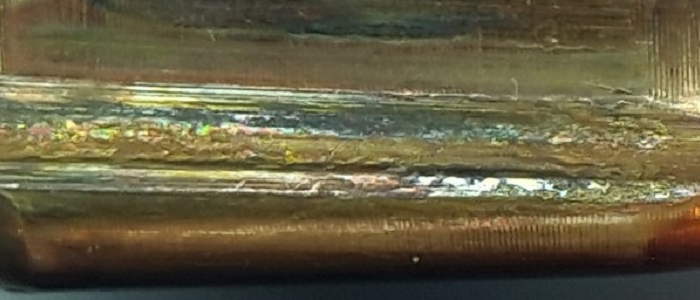
2. Borescope
This may not be seen as an essential tool. Once you get accustomed to look inside the barrel with this tool and learn to read the signs, it will quickly establish itself as indispensable. There are a myriad of cleaning theories floating around and it is almost impossible to evaluate all the ideas, solvents and suggestions without shooting in the dark. Armed with a good quality borescope and regularly using it will quickly help to establish an all effective and time saving cleaning routine.
A borescope can be used during a shooting routine to check for any fouling build up when the barrel is allowed to cool down. It can be used to compare carbon build up and fouling between different barrels. It can be used to validate cleaning methods. It can be used to better judge the maximum number of shots before cleaning is required. It can be used to evaluate the pros and cons of solvents and lubricants. Any serious shooter can not be without this tool.
1. Fitting the bore guide
If the bore guide consist of a universal kit ensure that the correct parts are assembled for your caliber. Check to ensure that jags and brushes will fit through the soft front end that goes into the chamber. Remove the bolt and place the bore guide tube into the action. The bore guide will have an adjustable locking mechanism designed to fit into the vacant bolt arm cavity. Lock it in such a way that the front part (in soft polymer or plastic) of the bore guide mates firmly with the neck section of the cartridge chamber. It should be firm enough to prevent fluids from entering the larger section of the chamber and also firm enough to easily push and pull brushes and jags through the front opening with the cleaning rod.
2. How to fit a patch
A patch will normally be pushed into the barrel with a cleaning rod. The force required to push a patch through the barrel should always be such that one arm can be used to push the rod even if it is fully outside of the barrel. The maximum force required shall not have the tendency to buckle the rod. If the rod tends to buckle, the jag and patch combination it too tight and should be corrected. A patch on a jag soaked in solvent will behave slightly different than a bone dry patch.
There is no hard and fast rule how the patch should be fitted or rolled. Fitting a patch to the jag with the sharp tip is fairly simple. Take a square patch and pierce it close to the center. Some people prefer to deliberately pierce it slightly off the perfect center point. If a soaked/wetted patch is the correct size you will be able to push it into the barrel without excessive force.
A patch can also be rolled onto a copper brush. The brush will have to be one or two calibers smaller to accommodate the extra volume of a patch rolled around it.
Experiment with both a “rolled patch on a brush” and a “patch on a jag” to determine / choose the best combination for a specific barrel. It is good to have both solutions available. The “rolled patch on a brush” is ideal for carbon solvents and cleaning and is not recommended when copper solvents are used. It can also be used to apply lubricant or interior coatings.
3. What type of solvents/chemicals to use
Two main culprits are ever present in a dirty barrel, carbon and copper. Gun shops sell various types of carbon cleaners, copper removers and lead removers. The general accepted norm is to start with the removal of carbon followed by a copper cleaner. If any of the all-in-one solvents are used then the procedure is quite simple. Any agent that effectively dissolve and lift carbon from the metal surface will be good enough. Try to experiment with a few different products before settling on one. The same can be done with copper solvents.
Some barrels have a tendency to accumulate more copper fouling than others. If this is the case then it is better to experiment with dedicated copper removers and stay away from all-in-one products in favor of a fast acting copper cleaning agent.
A general rule of thumb will be “the stronger the smell of ammonia” the more aggressive and fast acting the copper removal will be. Do not leave strong solvents for longer than 10-15 minutes at a time in the barrel. Failure to do so may lead to unwanted chemical attack/deterioration of the inner metal surface of the barrel. Also it is better to clean the ammonia solvent out after every soak and scrub cycle with a carbon-cleaner-only solution. The carbon cleaner solutions normally have barrel lubricating and penetrating constituents that will lower the risk of unwanted ammonia residue staying behind in micro crevices.
It may be necessary to repeat the ammonia solution cleaning process a couple of times before all the copper is removed. Always finish by washing a strong ammonia solution out of the barrel with a carbon-cleaner-only penetrator and lubrication solution. All-in-one carbon/copper solutions are not well suited to flush out unwanted strong solution chemical residues. Please refrain from bad practices as it is never a good idea to soak a barrel overnight in a strong ammonia solution.
Solvent manufacturers limit the ammonia concentration as a precaution and to prevent gun owners from destroying their barrels. Therefore it may be wise to save the more aggressive ammonia products exclusively for the problem barrels and use the lighter ammonia mixtures or all-in-one mixtures for barrels that are easy to clean.
4. What is the best “brush” to use? Copper, nylon or only a patch
It may be appropriate to start this discussion with a warning. Most cleaning routines are done with short forward and backward strokes while gradually moving forward until the opposite end is reached. A copper brush can only be pushed in one direction. Once the stroke is started it can only end with the copper brush completely exiting the barrel on the other side. Make sure the combined length of the cleaning rod and the bore guide is long enough for a full stroke of the copper brush.
It is good to start by cleaning out all the carbon from the barrel. Carbon solvents and penetrating solvents combine very well with a copper or nylon brush as well as a jag and patch. Of the three the best tool to get rid of stubborn carbon deposits is the copper brush. The very fine and strong fibers are well suited to get into the sharp crevice where the land sidewall and groove surface meet. Some shooters are very reserved about the use of copper brushes even though it’s such an effective cleaning tool. This is mostly due to a copper brush’s ability to damage the lands in the wrong hands. Way too much brushing with a copper brush tend to mechanically erode the barrel interior surfaces and the crown of the lands. Some contend that it will harm the crown as well.
Any form of permanent damage is highly unlikely when a copper brush is wielded by a skilled hand.
The by product of the chemical reaction between copper solvents and the copper fouling inside the barrel is a watery solution with a blue color. This very same “blue color of dissolved copper on a patch” is one of the best indicators of the presence of any copper fouling left in the barrel.
Copper solvents dissolve and destroy the very fine bristles of a copper brush. The use of copper containing cleaning tools (brush and jag) should be avoided as false “blue traces” can be generated by them. Therefore the best tools to use for copper fouling is a nylon brush in combination with a non-copper jag and a patch.
White patch material will clearly show any form of contamination inside the barrel. A patch can be wrapped around a copper brush or it can be pinned on a jag. There are long thin jags with a diamond pattern cut into the surface that can also be used for wrapping a patch, but the best jags feature a sharp pin in the front. Simply stick it through the center, even slightly off-center with a correctly sized path and push it into the barrel, it saves time and is very effective.
Related Articles
Introduction to Barrel Care and Cleaning
Good barrel cleaning habits may not be that obvious and can easily be contemplated as a dark art. This is the most important ritual after shooting and the sooner it is done the better. Good barrel care will not only improve you accuracy but it will also greatly improve the life of your barrel.
Barrel Care Part 1: How to know if a barrel is clean
What is a clean Barrel? It is a barrel free from any buildup of foreign material like gun powder residue or copper fouling in the grooves or anywhere on the lands. Every shooter has to know what the condition of the barrel is at any stage.
Barrel Care Part 2: What equipment to use for barrel cleaning
Setting up a proper cleaning kit can be costly. Some of the equipment is convenient and while others are essential. Settling on the right combination is largely a matter of personal preference. In this section all equipment will be discussed as well as their merits.
Barrel Care Part 3: How to clean a barrel
Developing the correct cleaning routine is a lot about common sense and a little about tradition. Due to many recent technological advancements and a huge variety of clean burning powders available today it will be wise to adopt modern gun cleaning practices.
Barrel Care Part 4: How to prepare a barrel before shooting
This section is all about the different techniques that can be used to provide a good form of dry lubrication prior to the first shot. First shot lubrication will also help to get on the button and consistent shot placement from a cold, recently cleaned barrel.